Back in college, even though I wasn't a creative writing major I took every poetry writing class that was offered because I loved the challenge. Also, I knew I would never write a word unless I paid a professor to force it out of me.
While I'm sure I wasn't writing anything particularly impressive, I was having fun. However, the fun didn't come easily. I never had any ideas of what to write, so in order to draw inspiration I would place limits on myself. For example, while literally every other student in my classes was writing free verse, I would try writing in the rhyme and meter of a sonnet, but in the form of a paragraph. Or I would ask myself, "What if every syllable of a line rhymed with its corresponding syllable in the preceding line." Or, "Can I write 30 lines all ending in the same rhyme sound?"
Essentially, by severely limiting my choices, I was forcing myself to use the few pieces that were left to their absolute highest capacity, and I was able to be much more creative than if I'd had the entire English language from which to draw. Hense the adage of writing teachers everywhere, "It's better to say a lot about a little, than a little about a lot."
Wedding photography is the same. I have to make great photographs within the limits of time, weather, location, and the needs of all the other people involved in the day. Expectations are high (as they should be), but often the situation is more limiting than people realize.
And I love that.
In fact, I often limit myself even more. While I'll bring an arsenal of lenses to a wedding, and I'll use them all when they are needed, for most of the day I'm shooting with one or two lenses. With fewer choices in front of me, I use what the day gives me to its absolute capacity. I attempt to do a lot with a little.
In other words, less is my secret to delivering more.

Showing posts with label Behind the Scenes. Show all posts
Showing posts with label Behind the Scenes. Show all posts
Tuesday, June 21, 2011


Saturday, February 5, 2011
Planning Ahead
It's been a while since I showed the difference a little Photoshop TLC can make.
Here's a frame from Julie and Randy's engagement session last month. The idea was nice, but the execution took some planning ahead. As much as I like getting the image right in camera, I knew as I set up this shot that it was going to take some work on the computer to bring about my vision.
As you look at the proof image (top), you'll notice that Julie and Randy are underexposed and the sky is way blown out. Normally, I would just expose for the subject and let the background go, but the sky was just so striking that day that I had to include it in this shot. Without using flash (which I avoided in this shot for a number of technical and aesthetic reasons) there is no way to properly expose for both the subjects and the background, since they are both so different in brightness.

To make sure I captured both the sky and the couple how I wanted to, I decided to bracket the image, which means that I took a series of exposures with different shutter speeds and then combined the best parts of them in Photoshop.
Add a little cropping, toning, a slight vignette, and a couple secret moves in Photoshop, and BAM: Julie and Randy get a unique and striking final image.

Here's a frame from Julie and Randy's engagement session last month. The idea was nice, but the execution took some planning ahead. As much as I like getting the image right in camera, I knew as I set up this shot that it was going to take some work on the computer to bring about my vision.
As you look at the proof image (top), you'll notice that Julie and Randy are underexposed and the sky is way blown out. Normally, I would just expose for the subject and let the background go, but the sky was just so striking that day that I had to include it in this shot. Without using flash (which I avoided in this shot for a number of technical and aesthetic reasons) there is no way to properly expose for both the subjects and the background, since they are both so different in brightness.
To make sure I captured both the sky and the couple how I wanted to, I decided to bracket the image, which means that I took a series of exposures with different shutter speeds and then combined the best parts of them in Photoshop.
Add a little cropping, toning, a slight vignette, and a couple secret moves in Photoshop, and BAM: Julie and Randy get a unique and striking final image.
Sunday, July 25, 2010
Proof and Final Image Comparison
I just finished blogging Heather and John's wedding photos the other day, but I thought I would take a moment to revisit one of them because it's a great example of the potential difference between proof and final images.

The color image on the left is the proof image. It isn't straight out of the camera. It's been adjusted a little bit for contrast, but it's pretty close to the original frame. The image on the right is the final image. It was part of a series of black and white images so obviously there isn't going to be any special color treatment applied to this image other than the black and white conversion.
After the lack of color, the first difference you'll probably notice between two images is that I removed the microphone in the final (right) image. To be honest, I almost didn't remove it. It isn't horribly distracting and removing it takes this photo out of the realm of photojournalism and into a more "artistic" version of reality. I decided that in this case, I was fine with not being completely accurate to reality for the sake of a cleaner image that better fit my vision. With other frames I may not have made the same artistic choice.
The difference between these two photos that is harder to notice is the removal of a little bit of sweat from the bride's face. This day was incredibly hot and at this point the bride and groom had been standing in direct sunlight for about 30 minutes. Understandably, there is going to be some wetness on the face. So in the final version, I cleaned it up a little bit. Again, to fit with my vision for what this photo should be.
Finally, when shooting in direct sunlight like this, you're going to have a huge amount of contrast between what is in the sun and what is not. You'll notice that in the final version I lightened the darker areas around the bride's face so we could better see her loving expression.
Wednesday, March 3, 2010
The Difference Between Proof and Final
I'm in the process of preparing Sarah and Justin's full blog post, but it's going to be a couple more days, so in the meantime I thought I would take the opportunity to show off a couple more final image previews and compare them to their proof image counterparts.
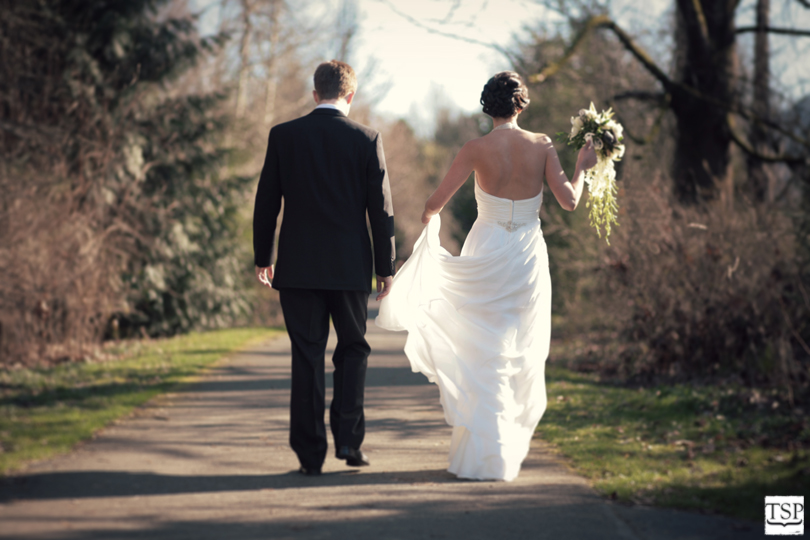
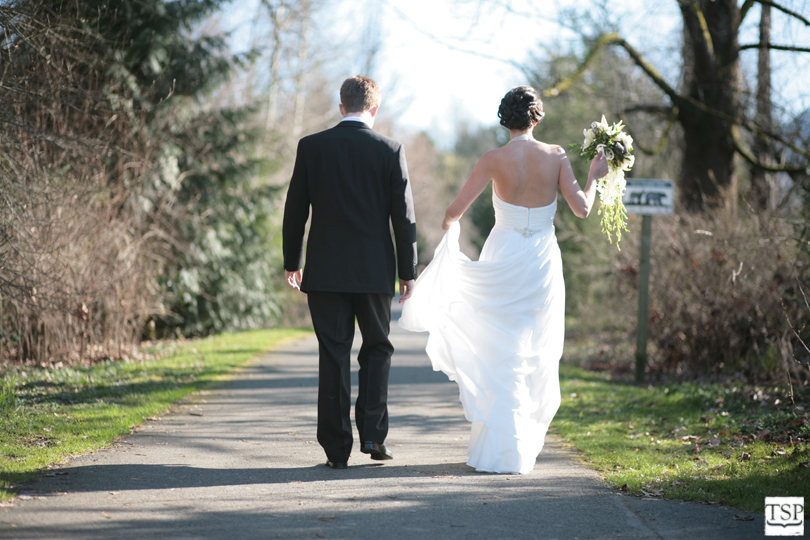
In this first set of images the final version of the image is on top. The aspect of this image that really caught my eye was the shape of Sarah's dress as she holds it up. As soon as I saw that shape, I knew this was going to be brought to the final image stage.
In the final version, you'll notice I cropped in a bit closer to Sarah and Justin to get them a little more centered in the frame and to cut out some unnecessary information. You'll also notice I removed the distracting sign on Sarah's right. Finally, I changed the toning a bit to give the image a more unique feel, and blurred the edges a little to draw the eye towards Sarah and Justin and to give the image a more aged, imperfect feel.
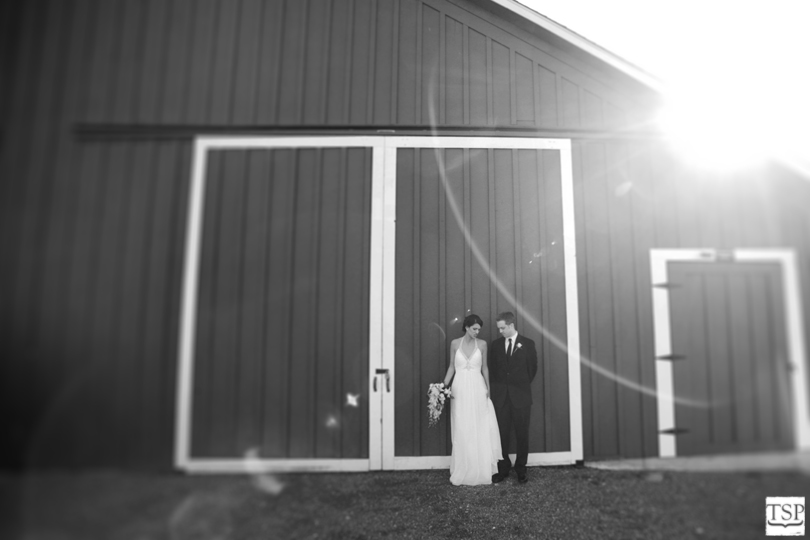
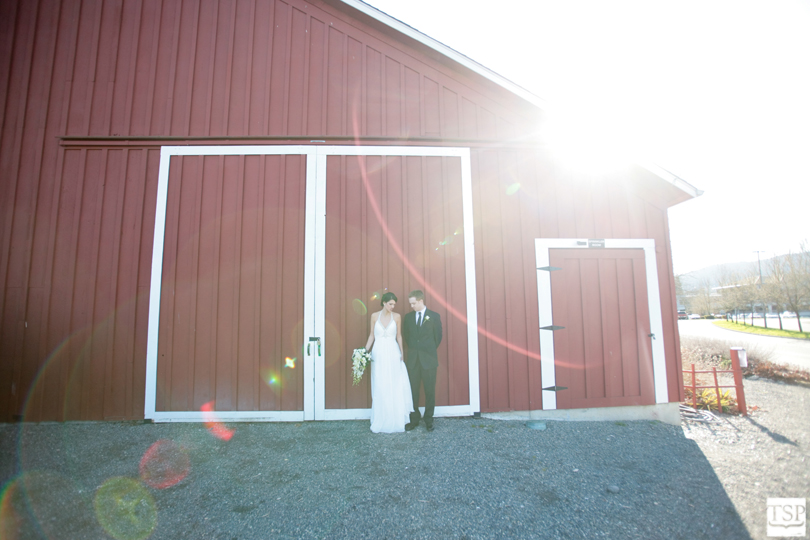
Images which use full sun as back-lighting can offer a very distinctive look, but they are also a bit of a craps shoot. You never know exactly what kind of flare and aberrations you'll get when you let the sun straight into your lens. I love it.
Obviously, the final version of this image was converted to black and white. I tried to make it work in color for a while, but finally decided it just looked better - more subtle - in black and white. Again, I cropped in closer to Sarah and Justin to remove the distracting and modern street details, and I added a tilt/shift lens effect to add visual interest and draw the eye to our couple. I also thought the extra blur again added a vintage feeling to the image.
Saturday, January 2, 2010
2009 Wedding Review: Appreciating the Art - Part 4
Catching Up
Jenny and Adrian
This first candid moment happened during Jenny's getting ready shots. Her mother surprised her with a necklace to wear that day.
Now, in these next few images, I'm going to try to break the mold of what a candid image can be.
Before you read any further, you might want to check out the first three parts of this series: Walking - pt. 1, The Moment After - pt. 2, and Posers - pt. 3.
Candid Moments
Today is going to be all about my thought process behind capturing candid moments. I did write a little bit about creating candid moments from what started out as posed moments in pt. 1 and pt. 2, but today I'm going to focus on moments that are actually candid. In other words, basically every image I make during the wedding day that happens outside the portrait sessions.
Jenny and Adrian
This first candid moment happened during Jenny's getting ready shots. Her mother surprised her with a necklace to wear that day.
I love this frame because I didn't have to tell you anything in the previous paragraph. It's clear from the picture exactly what is happening. A great image should be able to speak for itself, without the photographer standing over your shoulder explaining the moment to you. I included this image because it's a classic "candid moment". That is, a completely unposed, unplanned moment, captured photojournalism style.

Now, in these next few images, I'm going to try to break the mold of what a candid image can be.
Here, Jenny and Adrian are walking though a garden area during a quite time before their ceremony. I suppose this image could be considered posed because half the reason they were walking through the garden was so that they could have photographs and video taken of them.
Natalie and Sean
I loved this huge mirror in Natalie's waiting room before the ceremony. Then when all her bridesmaids crowded around her and started fussing with her hair, I knew there was a moment here I had to catch.
Ryan and Sarah
This candid image is a mixture of luck and skill, like I suppose many images at a wedding are. What really makes this image sing is the setting. Ryan and Sarah chose to have their wedding at the Bellingham Cruise Terminal. The dome of glass behind them let in amazing light all afternoon, and then during the time of the evening when the dance floor is usually crowded with dancers, people just cleared off and made room for Ryan and Sarah. The sky outside hadn't gone completely dark yet and I was able to expose it a couple stops below Ryan and Sarah. I love the reflections in the window of mostly just Ryan and Sarah over and over again. No one else was lit up because my lights weren't pointed at anyone else. Also, Ryan's head is positioned perfectly inside one of the squares of glass - completely uninterrupted. The light turned out working well too, which was a huge pain to achieve inside a glass ceilinged dome.
I really didn't give them any instructions though, and I just let them walk and enjoy each other, so this is at least close to candid. In this image, I decided to focus on the tree branches above them in the foreground. This is one example of trying to take a candid moment and see it in an artistic way. There is never much time to do this, but it's a good challenge to add visual variety to candid moments.

Natalie and Sean
I loved this huge mirror in Natalie's waiting room before the ceremony. Then when all her bridesmaids crowded around her and started fussing with her hair, I knew there was a moment here I had to catch.
Any time there is a mirror in a room, I'm going to find a way to use it. They just naturally add so much interest to the final image. Here, I like that the mirror multiplies the number of girls bent over Natalie, and it also allows us to see her face and get a hint of the architecture in the room.

Ryan and Sarah
This candid image is a mixture of luck and skill, like I suppose many images at a wedding are. What really makes this image sing is the setting. Ryan and Sarah chose to have their wedding at the Bellingham Cruise Terminal. The dome of glass behind them let in amazing light all afternoon, and then during the time of the evening when the dance floor is usually crowded with dancers, people just cleared off and made room for Ryan and Sarah. The sky outside hadn't gone completely dark yet and I was able to expose it a couple stops below Ryan and Sarah. I love the reflections in the window of mostly just Ryan and Sarah over and over again. No one else was lit up because my lights weren't pointed at anyone else. Also, Ryan's head is positioned perfectly inside one of the squares of glass - completely uninterrupted. The light turned out working well too, which was a huge pain to achieve inside a glass ceilinged dome.
So, while this image of Sarah and Ryan dancing had a lot to do with luck, it also wouldn't have worked if I didn't have the aperture, shutter speed, ISO, lens, on camera flash, and off camera flash dialed in to where I needed them before the moment happened. Mastery of equipment allows lucky moments to happen.

Heather and Dave
Even though this final image is candid, I still spent about five minutes setting it up. I took Mindy outside with me to test my flash strength both on camera and off camera (you can see the rays of light from the off camera flash coming down above Dave's head.) I knew they were going to be moving and I knew they were going to have lines of people on either side of them. I decided to close down the aperture of a wide angle lens in order to get the crowd more in focus and run backwards about 10 feet in front of them the last half of the exit.
The shot worked, and again thinking though this candid moment ahead of time and understanding how my equipment works enabled me to get the shot I had planned on.

Friday, January 1, 2010
2009 Wedding Review: Appreciating the Art - Pt. 3
Posers

Sarah and Ryan
From a photography perspective everything just clicked on Sarah and Ryan's wedding day. Great locations, great weather, people willing to pose, and a bit of luck made for an amazing day full of memorable images.
Lisa and Brandon
Many times in the portrait sessions, certain elements aren't exactly how I would like them. Sometimes I need people to move a bit, sometimes I need to change lenses, sometimes the background is distracting. So during the bride and groom portrait session I often have to choose between taking the time to make that certain element right, or moving on to get as much variety as we can in the limited time we have.

This next image certainly looks pretty candid, and it certainly carries the emotion many candid moments carry. However, this image happened because the girls were told to kiss Lisa. Just a reminder that posed images don't have to feel posed.

Natalie and Sean
On Natalie and Sean's wedding day we were behind schedule. For various reasons we only had about 20 minutes for a bride and groom session. So, after the group portraits we sneaked in a few more bride and groom portraits and this is one that came from that time. I was taking some fine, but fairly standard images with a long portrait lens (85mm), but I decided to see what I would see with a wide 17mm view, and when I looked through the viewfinder this is what I saw. Needless to say, I was glad I took the time to experiment even though we were a bit rushed for time.

Yesterday I wrote about capturing emotion and personality in candid moments just before or after the posed photos. Today I'm going to show a number of posed images and explain a bit of the story behind each of them. I'm not going to show the difference between final and proof images as I have in previous posts because I find myself saying the same things over and over again. If you'd like to see the difference between a proof image and a final image check out my posts on "Walking" and "The Moment After".
Jenny and Adrian
We'll start pretty simply. Jenny and Adrian had an incredible wedding with interesting details at every point throughout the day. One of those details were these big balloons that were guiding guests from their cars to the ceremony site. Jenny asked if they could have a picture with one. I took several, and while this is clearly not a candid moment between two people, the balloon adds enough interest and quirkiness that the image still draws some emotion from the viewer.
This next image is also of Jenny and Adrian and while it may look candid it is actually posed. Jenny and Adrian sat patiently while Mindy and I rigged the lights to work properly in this very dark bar area of the Arctic Club in Seattle. The people next to them are actually the band they hired, and they just happened to be at the bar before they went on.
This shot works because of the repeating patterns of the bodies and the bottles, interesting, directional light (thanks Mindy), and a moment that appears timeless and un-posed.

Sarah and Ryan
From a photography perspective everything just clicked on Sarah and Ryan's wedding day. Great locations, great weather, people willing to pose, and a bit of luck made for an amazing day full of memorable images.
For this shot, we were shooting outside at another location and a woman walking by just mentioned that she and her husband owned a Persian rug shop just around the corner and we could shoot in there if we wanted. Well, we jumped on the opportunity and when I asked if they could climb up on this table to pose, not only did the owner say yes, but he brought in more rugs and helped arrange them for the perfect shot.
And while this is a very striking and unique location, would this frame really be anything at all without the attitude that Sarah and Ryan brought to this image?

This next image is Sarah again, this time with her bridesmaids. She mentioned how the bridesmaid's dresses had pockets and so I thought I would try to highlight that feature by cutting off the girls' heads and making this frame just about the clothing. Like the Persian rugs, this image has a unique element that adds interest, but what really makes it a great image is the posing. I have to say I didn't do much as far as posing these girls. I simple said something like, "Give me your sexy model pose!"
Again, everything just came together perfectly. This photo is all about the little details: The tweaked ankle of the girl on the far right, the flowers, Sarah's yellow toed shoe poking out from beneath her dress, the pockets of course, and again, the raw attitude the girls were willing to bring to the image.

Lisa and Brandon
Many times in the portrait sessions, certain elements aren't exactly how I would like them. Sometimes I need people to move a bit, sometimes I need to change lenses, sometimes the background is distracting. So during the bride and groom portrait session I often have to choose between taking the time to make that certain element right, or moving on to get as much variety as we can in the limited time we have.
I've never regretted taking the time to tweak an image a bit to make it conform to my vision. In this case, I had the Rolls Royce positioned to take portraits from the front of the car. However, as we were taking their portraits, Lisa and Brandon's parents kept asking them to do a "dutch kiss". I'd never seen this before but I thought it was hilarious and I immediately knew I wanted them to do it perfectly squared in front of the car. That meant that I had to ask Lisa's dad to move the car "just a bit" for a third time. Yes, I risked being a pain, but he was fine with it and I never would have had this image if I hadn't taken the time to adjust the reality of the situation to my vision of the image.
This next image certainly looks pretty candid, and it certainly carries the emotion many candid moments carry. However, this image happened because the girls were told to kiss Lisa. Just a reminder that posed images don't have to feel posed.
Natalie and Sean
On Natalie and Sean's wedding day we were behind schedule. For various reasons we only had about 20 minutes for a bride and groom session. So, after the group portraits we sneaked in a few more bride and groom portraits and this is one that came from that time. I was taking some fine, but fairly standard images with a long portrait lens (85mm), but I decided to see what I would see with a wide 17mm view, and when I looked through the viewfinder this is what I saw. Needless to say, I was glad I took the time to experiment even though we were a bit rushed for time.
Thursday, December 31, 2009
2009 Wedding Review: Appreciating the Art - Part 2
The Moment After
Natalie and Sean
Kathryn and Dustin
Sarah and Ryan
With Sarah and Ryan, I had asked them both to look at me with their hands at their side. I was going for a very symmetrical, and straight-laced image you might have found in your grandpa's attic. When Sarah was done posing and looked at Ryan, I knew I had my connection. But, again, it was an orchestrated connection in which I had set up their location, position, and framing.
Deanna and Tim
As I reflect on 2009, I'm attempting to reveal something of my thought process during a day of wedding photography, as well as the thought process behind my post-production. My hope is that it will help you to appreciate the foresight and artistic intention are behind a striking wedding image. Yesterday I wrote about how I use walking to achieve a variety of effects.
Today, I want to look at one of the most important techniques I use when shooting during the bride and groom's portrait session. Namely, I keep the camera glued to my face after the "official portrait" is over. Yes, I like the look of completely posed portraits if they are done right. (I'll have some examples of those in a later post.)
However, those moments that happen right after (or right before) the posed picture are often more emotive and personal than the posed pictures. It's nice to be able to offer both dramatic and fun portraits (posed), as well as the emotional portraits that tend to show the personalities of the couple (the moment after). Here are some examples:
Natalie and Sean
Both of these images are very similar, but the top image is an example of a "moment after" and it is also a "final" image (the type of image you see on my blog). The bottom image is an example of a posed shot as well as a "proof" image (one of 600 images delivered on a wedding proof DVD, for example).
Obviously, in this series I took some time to position myself below them and to make sure the background consisted of nothing but the colorful umbrella. I suppose that much of each of these images is posed. Once I had my composition, I asked Natalie and Sean to kiss (the proof image on the bottom). It's a great image, and in this case because they're both smiling while kissing I think it really does convey emotion.
But what would I have missed if I had taken the camera away from my face after the kiss? I would have missed Natalie and Sean's huge smiles and an image that I think conveys their connection more strongly and personally than the kissing picture.
As far as post production goes, you can see I pretty much left this one alone. I bumped the color a bit (not something I usually do) because I thought a picture with an background like this needed it, and I added some contrast. I also smoothed some of the faint lines on Natalie's neck. Not that it really needed it, but I figured since it was in the foreground of the image I might as well smooth it out.


Kathryn and Dustin
These two versions of Kathryn and Dustin aren't so much about capturing a great connection after the posed moment, but about capturing what looks like a very un-posed, candid moment. The catch is that it is positioned and framed exactly how I want it before the moment happens. That's what is nice about the bride and groom portrait session: I can get the candid shots everyone loves, but I have much more control over the composition and location than I would during another part of the day (for example getting ready shots or the reception).
Here, the final image (top) is given a special antique toning during post production that I thought would compliment Kathryn's dress and her taste.
The bottom image is an example of how a proof image would be processed.


Sarah and Ryan
With Sarah and Ryan, I had asked them both to look at me with their hands at their side. I was going for a very symmetrical, and straight-laced image you might have found in your grandpa's attic. When Sarah was done posing and looked at Ryan, I knew I had my connection. But, again, it was an orchestrated connection in which I had set up their location, position, and framing.
As far as post-production goes, in the final image (top image) I added a very strong texture which was really more about color and mid-tones that texture. It dulled the colors a bit and really gave this image a unique feel. I also added a vignette to draw attention to Ryan and Sarah and to give it a more aged feel.
Again, the bottom image is an example of how a proof image would be processed.


Deanna and Tim
Sometimes I need to prod the candid moments along. In this case, Tim was probably not the most excited person to ever pose for a camera, but he was a great sport and did everything I asked. It was just going to be difficult to get a genuine moment when he was self-conscious of the camera all the time. So I made sure to use a long lens to give them their space and I had them pose in the middle of the barn door and smile (the bottom proof image). It was a fun image that I almost processed into a final image for the blog.
But I was still looking for that candid moment. So I told Tim to just walk over to Deanna (the top, final image). It created a sense of movement and interest. It told a small story. (Tim looks like a bashful 9th grader going to ask an expectant girl to dance.) It even revealed the folds of Tim's suit in the light, giving greater depth to the image.
So I don't know if you can really call this final image (top) a candid image since Tim was doing exactly what I told him to do, but it looks and feels candid because it's the moment after the "posed" image (bottom, proof).
As far as post-production goes, I again just warmed it up to give it an antique look, added a slight vignette, and just tried to leave a good frame alone.


Wednesday, December 30, 2009
2009 Wedding Review: Appreciating the Art of Wedding Photography
Year in Review
As a 6th grade teacher, I often have my students engage in various reflection exercises. I think it helps us learn what we do well and just as importantly it helps us learn our areas of weakness. Reflecting on the past enables us to do the future better. So, as 2009 is coming to an end I thought it would be fitting to reflect a bit and post some of my favorite wedding images of the year. However, as I started going through them I realized a couple things: 1) There are way too many to post, and 2) there are certain techniques I use in my wedding photography over and over again.
So I decided not to show ALL of my favorite images, but to group some of my favorite images into meaningful categories which will give you a glimps of how I work on a wedding day.
Furthermore, I decided to take this time of refection one step further and not only write about techniques I use to capture images, but also techniques I use in post-production. My hope is that these next few days of reflection will help you learn how to appreciate the art of wedding photography.
Walking
I thought I would start today with a series of walking portraits. Often, during the bride and groom's portrait session I will just ask them ignore me and just walk away. Sometimes I stay where I am and capture different framings of them as they move away, and sometimes I'll run along just behind them capturing closer, more candid feeling moments. Then I ask them to just turn around and walk back toward me, getting similar shots as before except now instead of creating an objective, distant or symbolic image of a bride and groom, I'm creating a more personal, subjective portrait of Deanna and Tim, for example.
Deanna and Tim
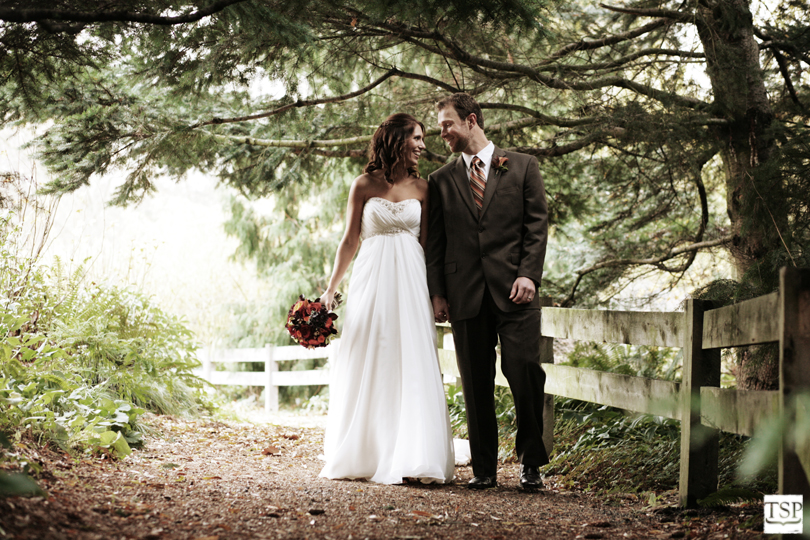
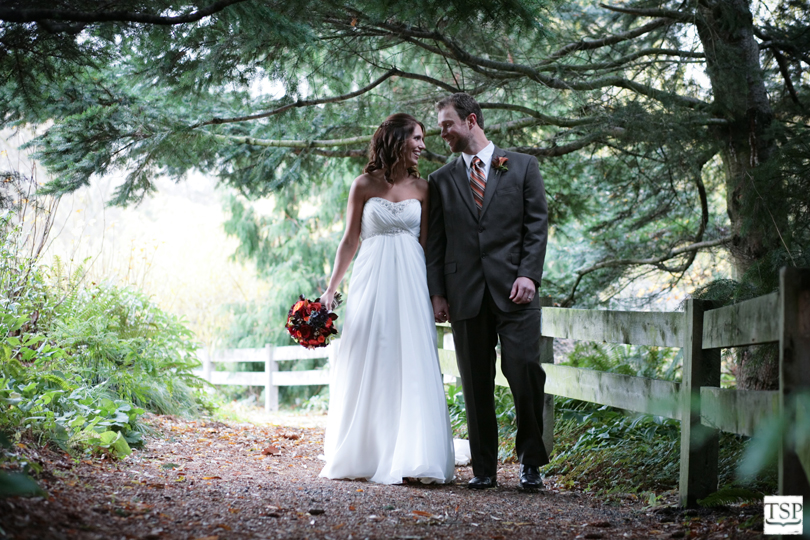
Here is a recently posted image of Deanna and Tim. It was a cold and wet day, so it isn't an accident that the are positioned under a tree. Also, since the ground was wet, we were worried about Deanna's dress, so if you look very carefully you can see a white table cloth behind her that we kept positioning under her. In fact, since Deanna couldn't really afford to drag her dress across the ground, for this picture I just told them to pretend to walk.
Now on to the post-production. Probably the most noticeable difference between the final (top) image and the proof (bottom) image is the color temperature. Neither is wrong or right, but as I was processing these images for the blog I decided to go warm instead of cool. Also, I played a bit with the saturation of the image to give it a more aged, timeless feel. Finally, in the final image I lightened the shadows on Tim's face. Not too much or it would look Photoshopped, but enough to catch some of his expression.
Kathryn and Dustin
Heather and Dave
This next couple is Kathryn and Dustin. This was one of those instances where I told them to walk and I chased after them, intentionally cropping important information out of the frame in order to create a more striking, unexpected image. The most important difference here between the final image (top) and the proof image (bottom) is again the toning. Playing with mid-tones, laying a texture (that hopefully you didn't even notice was there), and otherwise leaving a good frame alone was what made this final image memorable.
Heather and Dave
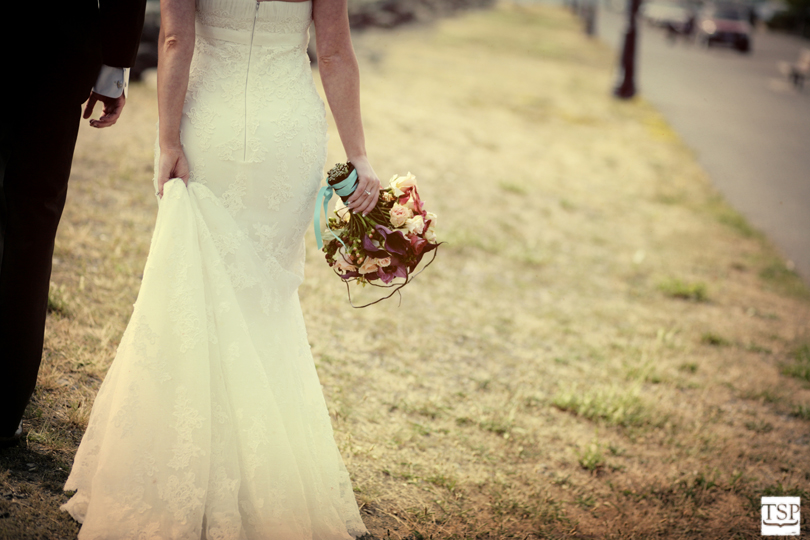
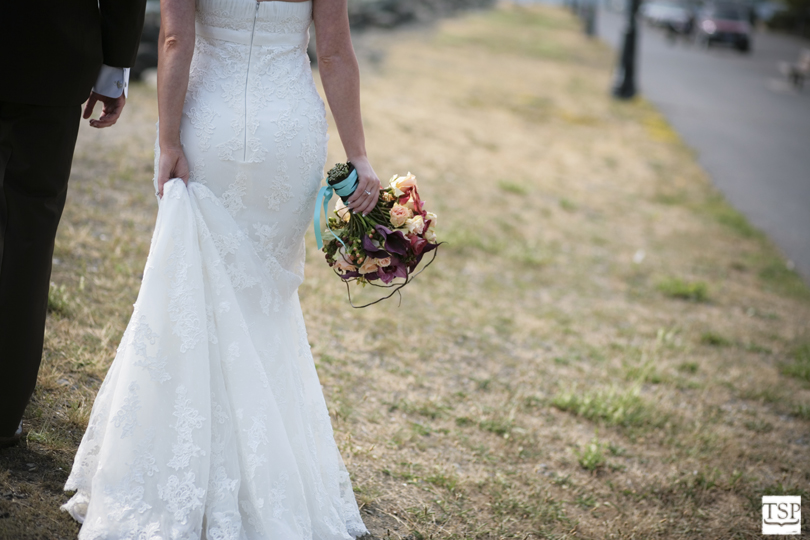
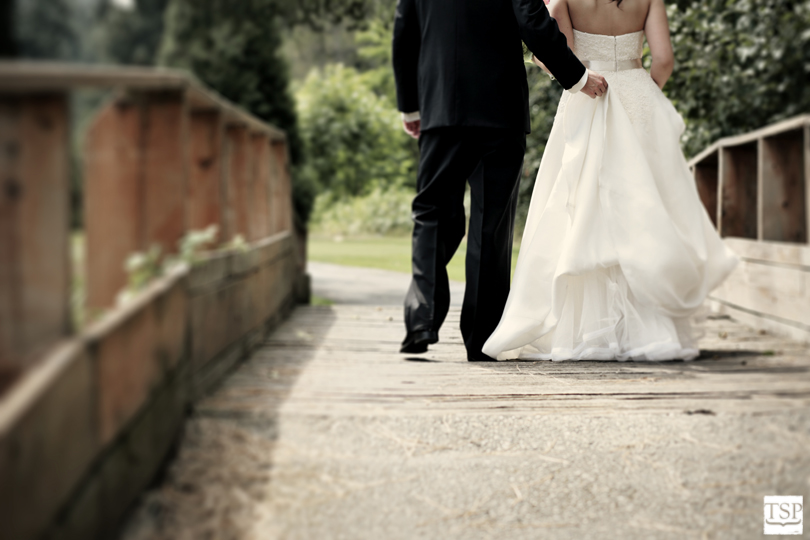
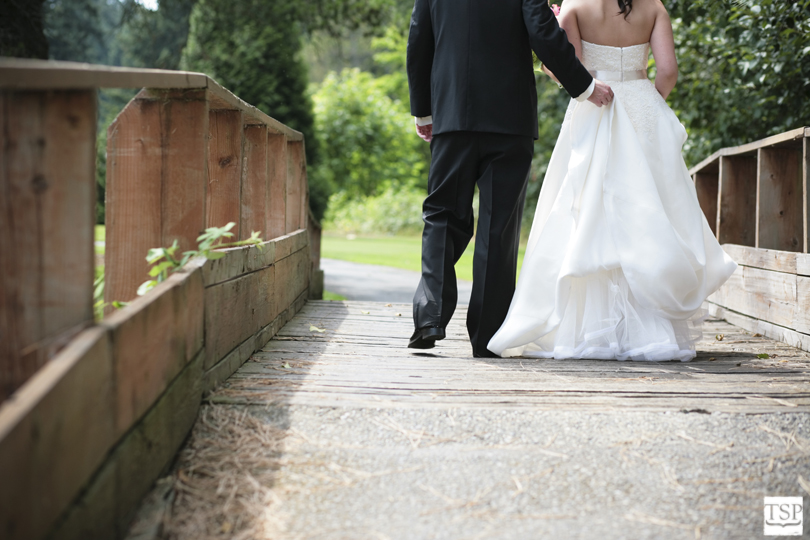
This time I asked Heather and Dave to walk away from me and I stayed where I was until they fell into the framing I had envisioned. I love it when the groom helps the bride with her dress because it isn't the kind of thing many people would intentionally include in a posed picture. So even though this is in fact a posed photograph, it appears candid because of that one unexpected element.
The post-processing on this image again has a unique toning. I try to process each wedding I shoot uniquely. Most of the time I'll try to pick up cues from the decor of the wedding, the dress, the venue, or sometimes I'll just pick a style that feels right.
Other than toning, my primary focus for this image was drawing the eye to Dave's hand. To do this I 1) darkened the other areas of the photo and lightened the area around couple (hopefully subtly enough you can't notice), and 2) I blurred the bridge. I didn't think it was a particularly nice bridge anyway, so and I was happy to have the idea of a bridge without the actual details of this bridge.
Natalie and Sean
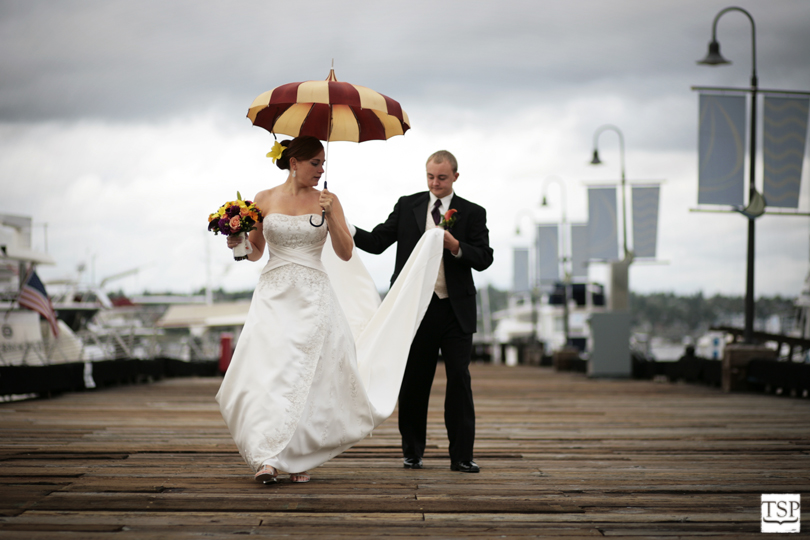
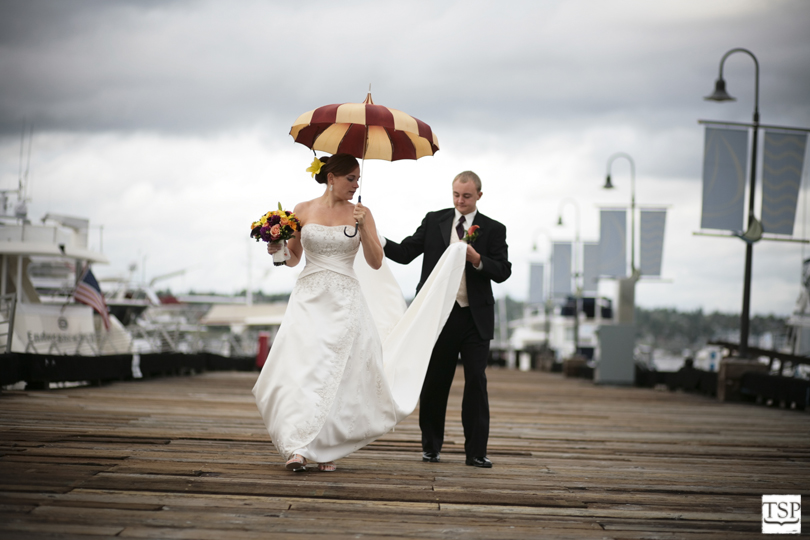
This final walking picture was taken after Natalie and Sean thought they were done posing. In fact, they were done posing and that is what brings this image to life. As far as post production goes, I straightened the horizon and played with the contrast a bit on the final image (top), but mostly just left it alone. Sometimes the best thing you can do in Photoshop is nothing.
Friday, November 20, 2009
What's the Difference Between Proof Images and Final Images?
I've had a few people tell me recently that they weren't sure what the important difference was between proof images and final images. Here's one example, taken from a recent family portrait shoot at Hovander Park.


The top image is the final image. For this series (which will be posted soon) I chose to go with an antique toning that I thought complimented the stormy weather, farm buildings, and fall leaves. In addition to tweaking contrast and lightness, I also removed the distracting element below the girls and added a vignette to draw the eye to the girls.
I'll post some more examples in the coming weeks.
Subscribe to:
Posts (Atom)