How to use fill flash to take a portrait in the sun:
1) Review your image to see if the subject's face is covered in shadow in an otherwise properly exposed image.
2) If the face is in shadow, find the button on your camera that looks like a lightning bolt/arrow. Press it and select "forced flash on". Take the picture again.
Boring Details:

I'll admit right away that I am not a huge fan of fill flash. In fact my friends sometimes make fun of me for avoiding using my camera's flash at all costs in casual settings. To my eyes, I like the look of the exposure compensation correction from last week much more than fill flash correction. Fill flash often seems too unnatural for my taste. It is boring, flat, on-axis light, and coming from a simple point and shoot camera, it doesn't mix well with ambient light. I would much rather blow out the background and have a natural looking image, as in the top image from last week.
So why use fill flash? Well, it is easy. To many people, it is simpler to understand turning on a flash than some weird scale of exposure compensation. Most of the time, we aren't concerned with lighting at all. We just want a picture where we can see everybody's face. We want a method that is fast, because moments are fleeting and we would rather have a picture with uninteresting light than a no picture at all.
Fine Tuning Fill Flash
I decided to see if I could mellow out the effect of the fill flash on Mindy's face, and create a more natural looking portrait. Normally, we could just turn the power of the flash down a few stops, but on my simple point and shoot camera that isn't a option. The flash is either on or off. So in order to lessen the effect of the flash on Mindy, I had to move the flash further away from Mindy.

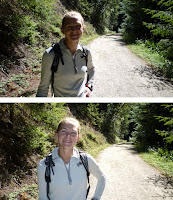
In this first image, I moved back a few steps and took a picture with the forced flash on at full power (my only option). Because I was back from Mindy a few extra feet, I could already tell the flash was having a less harsh effect.
In this next image I moved even farther away because I wanted the effect of my flash to be even weaker.
The light falling on Mindy from my flash was about what I wanted so I stayed where I was and used my zoom to recompose the image closer to my original shot. The zoom degrades the quality of the image, though, so at this point it is becoming a trade off between poor light or a grainy picture.
Finally, here is the original full power fill flash image once again for comparison.
Stay tuned for a couple more methods for taking portraits in the sun, which will prove much more aesthetically pleasing than the use of fill flash. In the meantime, can you think of what other methods you might use on a sunny day to keep your subjects face from being covered in shadow?